
AI Clothes Changer: How Outfit Swapping Actually Works (2026)
An AI clothes changer takes two pictures, a person and a garment, and returns one picture of that person wearing that garment. That is the whole promise, and it is simple enough that dozens of tools now advertise it in nearly identical words. The results are not identical. Feed the same two photos into several of them and one returns your product faithfully, another returns something that resembles it with the print redrawn, and a third changes the person's face along with their outfit. This article explains where that difference comes from, and what it means if you are putting one in front of real customers.
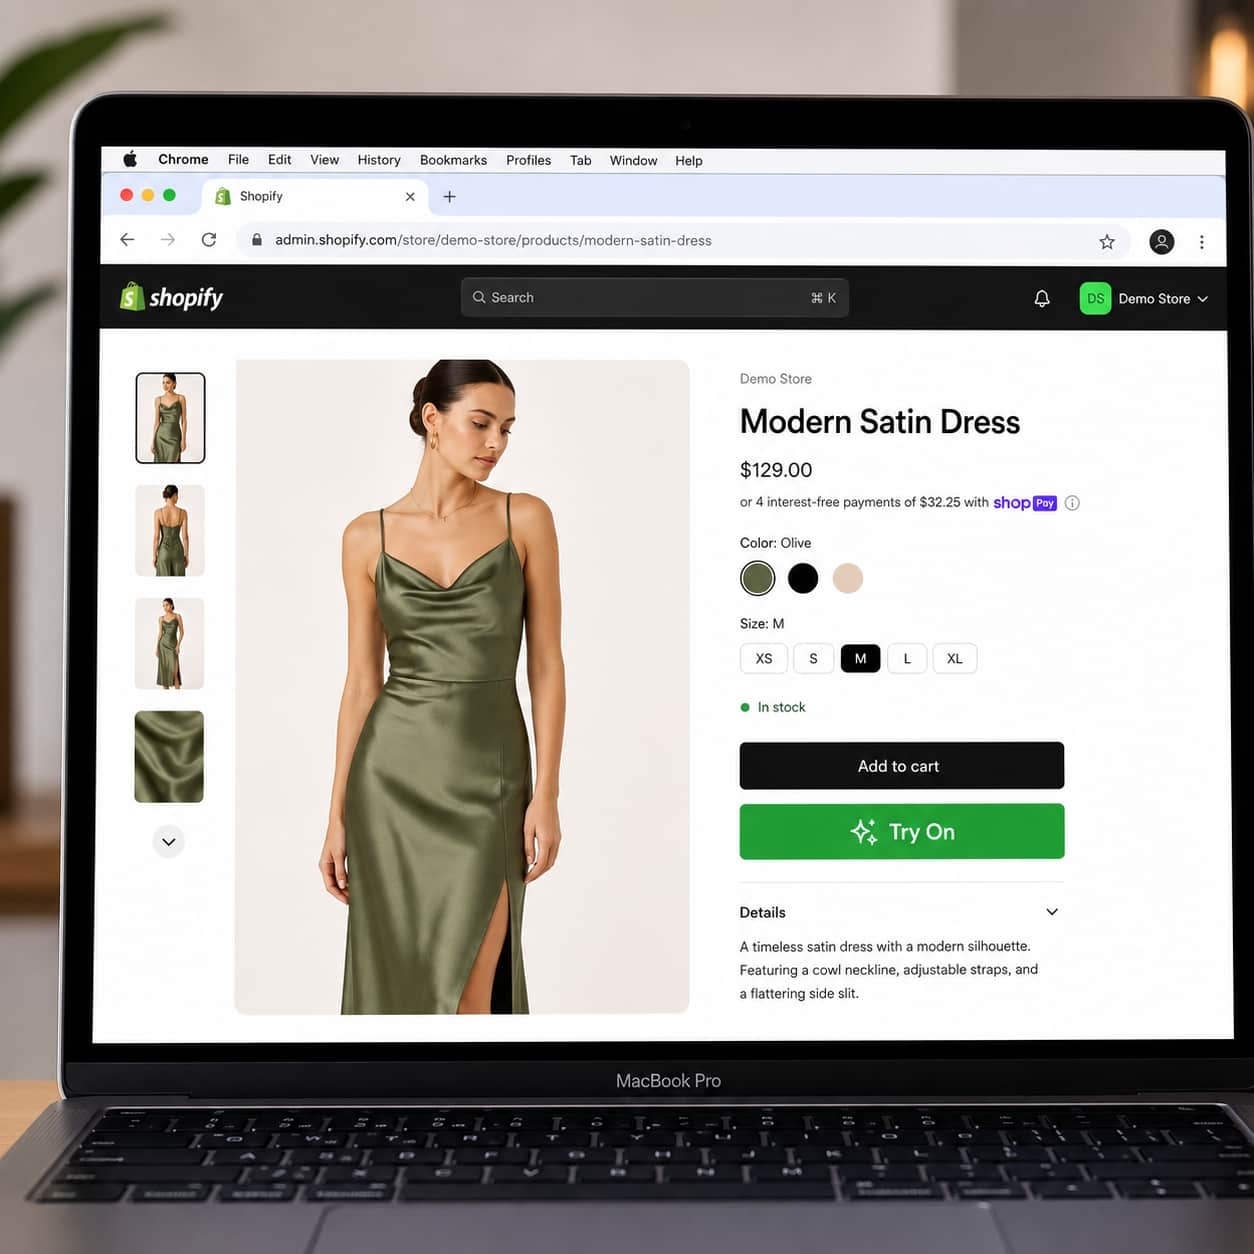
What an AI clothes changer is
The category has collected a lot of names. AI clothes changer, AI outfit changer, AI dress changer, clothes swap AI, virtual clothes changer. On an e-commerce store the same technology is usually labelled virtual try-on or a virtual fitting room. These names describe use cases, not different technologies.
Underneath, there are only two inputs and one output:
The three pieces
- Person image.A photo of whoever will be wearing the garment. On a store this is the shopper's own photo; in a studio workflow it is a model.
- Garment image. The item to put on them, usually a catalogue product photo, either flat or worn by a model.
- Result image. The person, recognisably themselves, wearing the garment, recognisably that garment.
Both halves of that last sentence carry weight. A result where the person is recognisable but the garment has been reinvented is useless for selling, because the shopper is evaluating something you do not sell. A result where the garment is perfect but the person has been beautified into someone else is equally useless, because the shopper is not looking at themselves. Good output holds both at once, and that is harder than it sounds.
How it works, step by step
"Upload a photo and AI does the rest" is where most explanations stop. Here is what actually happens in a production system between the upload and the result.
Step 1: Input validation
The uploaded file is checked for format and size, and converted if necessary. Phone photos arrive in formats that image libraries often cannot read directly, so HEIC from iPhones typically gets converted to JPEG first. Oversized images are downscaled, because sending a 15MB photo to a model wastes time without improving the result.
Step 2: Content moderation
Anything that accepts public photo uploads needs this, and it should not be optional. A commerce-grade tool screens both the person photo and the garment photo before generating. Skipping this step is how a try-on widget quietly becomes an image-generation service for content you do not want associated with your brand.
Step 3: Framing and preparation
The person photo gets cropped and normalised so the body sits predictably in frame. This is also where a well-built system decides whether the photo needs adjustment before transfer, which is the step most tools skip entirely and the reason draped garments fail on them.
Step 4: The transfer itself
The prepared person image and the garment image go to the model, which produces the composite. This is the expensive step and the slow one, typically twenty seconds to a minute and a half depending on the quality setting.
Step 5: Quality checking
Generated images sometimes contain anatomy errors, most commonly an extra hand or a malformed arm. These are stochastic, meaning the same inputs might produce a clean image on a second attempt. A system that checks its own output and regenerates once when it finds a defect shows visibly fewer broken results than one that returns whatever came back first.
Step 6: Delivery and retention
The result is returned to the shopper and, depending on the product, stored briefly so they can revisit it. Retention is a policy decision rather than a technical one, and it deserves an explicit answer from any vendor you are evaluating.
Why the pipeline matters to you
Every step above is somewhere a tool can cut corners invisibly. No moderation is cheaper. No preparation is cheaper. No quality check is cheaper. None of those omissions appear on a marketing page, and all of them appear in the output once you run your hardest products through.
Transfer vs generative: the split that matters
This is the single most important thing to understand about AI clothes changers, and it is rarely explained, because explaining it means admitting a limitation.
There are two fundamentally different ways to build one.
Garment transfer
A transfer model is purpose-built for this job. It takes the garment image as a direct visual reference and maps it onto the person, warping the fabric to follow their body. The model's task is to move something that already exists, so the print stays the print, the colour stays the colour, and the embroidery stays where it was.
Generative redraw
A general-purpose image model works differently. It interprets the scene, then draws a new image matching a description of what it should contain. Ask it for "this person wearing this dress" and it produces a person wearing a dress that resembles the reference. Very often that is genuinely beautiful. It is also, frequently, not your product.
| Behaviour | Transfer model | Generative model |
|---|---|---|
| Print and pattern | Preserved closely | Reinterpreted, often subtly |
| Embroidery and fine detail | Mostly retained | Smoothed or invented |
| The person's face | Left alone | Frequently altered or beautified |
| Background | Preserved | Often regenerated |
| Artistic quality | Realistic, occasionally stiff | Often more striking |
| Suitable for selling a product | Yes | Risky |
| Suitable for social content | Yes | Yes |
The practical test takes one minute. Run a garment with a busy, specific print through the tool, then count something countable in the output: the number of stripes, the position of a logo, the stones on an embroidered border. A transfer model gets most of them right. A generative model produces a convincing pattern with the wrong count, which is exactly the kind of error a customer notices when the parcel arrives and not before.
A returns problem, not an aesthetics problem
If a shopper buys based on a generated image that differs from the item, the mismatch surfaces at delivery. That is a return, plus a customer who now trusts your product images less. An AI clothes changer intended to reduce returns can increase them if it shows a garment you do not actually sell. See our breakdown of how virtual try-on affects clothing returns.
Toy tools vs commerce tools
Search for an AI clothes changer and most results are consumer apps for changing your outfit in a selfie before posting it. They are good at that. They are built for a different job than selling clothes, and the differences are structural rather than a matter of polish.
| Requirement | Consumer app | Commerce tool |
|---|---|---|
| Runs on your product pages | No | Yes, as a storefront widget |
| Uses your catalogue images | Manual upload each time | Automatic from the product |
| Watermark on output | Usually | Should be none |
| Content moderation | Varies | Mandatory on every request |
| API access | Rare | Expected |
| Cost model | Subscription per user | Per try-on or per plan |
| Retention policy | Often unstated | Explicit and documented |
| Works in a physical shop | No | Kiosk mode available |
If you are changing your own outfit for a post, use the free app. If shoppers are making buying decisions from the output, the requirements in the right-hand column stop being nice-to-haves.
Which garments break, and why
Every AI clothes changer has a comfort zone. Inside it, results are consistently good. Outside it, quality degrades in ways that are predictable once you know what causes them. Vendors rarely publish this, so here it is plainly.
| Garment | Difficulty | What tends to go wrong |
|---|---|---|
| T-shirts, tops, shirts | Easy | Very little. This is the ideal case. |
| Jeans and trousers | Easy | Occasional length mismatch on unusual proportions. |
| Dresses and gowns | Moderate | Hem length drifts; the shopper's existing outfit can show through. |
| Heavy prints and logos | Moderate | Pattern warps at fabric folds; generative models redraw it entirely. |
| Sheer and translucent fabric | Hard | Transparency is approximated; layering underneath reads incorrectly. |
| Layered outfits | Hard | Layer order collapses; jackets merge into the garment beneath. |
| Sarees, lehengas, draped wear | Hard | Renders as patterned trousers without a preparation step. |
| Heavy embroidery and beadwork | Hard | Fine detail simplifies, especially across a diagonal drape. |
Two practical consequences. First, judge a tool on your hardest category, not your easiest, because everything handles a plain t-shirt. Second, if your catalogue sits mostly in the top two rows, most tools will serve you adequately and you can choose on price and integration instead.
The draped clothing problem
This deserves its own section, because it is the clearest example of a limitation that looks like a bug but is actually a consequence of how transfer models work.
A transfer model follows the silhouette it can see. If the shopper is photographed in jeans, the model sees two separate leg shapes and maps the garment onto them. For a dress that mostly works. For a saree it produces something genuinely strange: saree fabric, correct colour, correct border, rendered as two trouser columns. The model did exactly what it was built to do, which was follow the shape in front of it.
Why the obvious fix does not work
The intuitive answer is to tell the model "this is a saree, drape it as one piece". Transfer models do not take instructions that way. They take two images and produce a composite. There is no text channel to argue with.
The workable fix runs earlier: adjust the person photo so the silhouette is a single continuous shape before the transfer happens. The model then follows that shape instead, and the saree drapes as one piece. This costs an extra generation step, which is why most tools do not do it.
There is a second-order detail that matters for authenticity. A saree's pallu, the loose end draped over the shoulder and arm, needs visible shoulder and arm space to fall across. If the preparation step covers the arms, the pallu has nowhere to land and quietly disappears from the result. The garment is then technically present and visibly wrong to anyone who wears sarees.
TryOnCloud handles this through a coverage check that runs before transfer and only fires when the garment and the shopper's silhouette actually mismatch, so shoppers already photographed in a full-length garment do not pay for an unnecessary step. Our guide to virtual try-on for Indian fashion retail covers the market side of this in more detail.
What makes a photo work
The largest quality variable is not the model. It is the photo the shopper uploads. These guidelines are worth putting in front of shoppers directly, because they improve results more than switching vendors does.
Works well
- Full body, head to feet in frame
- Facing the camera directly
- Even, diffuse light
- Arms slightly away from the torso
- Plain or uncluttered background
- Fitted clothing, so the body outline is readable
Causes problems
- Cropped at the knees or waist
- Strong side lighting or deep shadow
- Motion blur or a low-light phone shot
- Arms crossed or hands in pockets
- Sitting, turned away, or at a steep angle
- Very baggy clothing hiding the silhouette
The failure mode worth understanding: when the model cannot see a body part, it does not leave a gap. It invents one. Crossed arms are the most common cause of the extra-hand artefact, because the model is reconstructing a hand it never had a clear view of.
Putting one on your store
How you integrate depends on your platform, and the honest summary is that Shopify is the easy case and everything else routes through an API.
Shopify
A try-on app installs from the app store and adds its button through the theme editor as an app block. No theme code is edited, which means no risk to your template and a clean uninstall. It reads existing product images, so there is no catalogue migration and no new photography. See the step-by-step Shopify setup guide.
WooCommerce, WordPress and custom storefronts
These use the developer API. You send a person image and a garment image, and receive the result image back. Because it is a plain HTTPS request, it fits into any stack, and it is also how agencies put try-on into client sites under their own branding. Details are in the virtual try-on API guide.
Physical retail
Kiosk mode runs the same engine in a browser on a tablet in-store. No app install, no shopper account. The shopper can send their photo from their own phone by scanning a QR code, which avoids the awkwardness of a shared camera. There is an optional pay-per-try-on flow. See how a virtual try-on kiosk works.
What it costs to run
Every generation costs real compute, so any serious tool prices per try-on somewhere, whether that appears as a plan allowance or as credits. The figures below are TryOnCloud's current pricing.
| Shopify plan | Monthly | Included try-ons | Extra per try-on |
|---|---|---|---|
| Free | $0 | 10 | Not available |
| Starter | $19 | 100 | $0.19 |
| Growth | $49 | 300 | $0.15 |
| Scale | $145 | 1,000 | $0.12 |
Off Shopify, credit packs are bought once and never expire: $0.22 per try-on at 50 credits, $0.16 at 300, and $0.12 at 1,000 or more. Every paid Shopify plan also carries an approved spend cap, so a traffic spike cannot generate an unexpected invoice.
The question to ask about any free tier
Free try-ons cost the vendor money, so they are limited somewhere. Ask where. Ten genuinely free try-ons with no credit card is a different proposition from a trial that requires payment details and converts silently. TryOnCloud's ten free try-ons are shared across your storefront and API rather than counted twice.
Privacy, moderation and consent
An AI clothes changer processes photographs of people's bodies. That deserves more attention than it usually receives, and the questions below are worth asking any vendor before you put their widget in front of customers.
Four questions worth a direct answer
- How long are shopper photos kept, and who can see them?"We delete after N days" is a real answer. Silence is also an answer.
- Are photos used to train models? This should be stated explicitly, not left ambiguous.
- Is moderation always on, or a setting? If it is a setting, it will eventually be off.
- What happens on uninstall? Does stored data go with it, and how quickly?
For reference, TryOnCloud deletes result images automatically after seven days, runs moderation on every request rather than as an option, and does not retain raw developer API results at all unless a developer explicitly enables it, on the grounds that those are their customers' photos rather than ours.
Evaluation checklist
If you are comparing AI clothes changers for a real store, this is the shortest path to a decision. It takes about thirty minutes and tells you more than any feature list.
- Test your hardest garment first. Not a t-shirt. Your busiest print, your sheerest fabric, your longest draped item.
- Count something countable. Stripes, buttons, embroidery motifs. This exposes a generative redraw immediately.
- Check the face. Compare the result against the original photo. Any beautification means the model is regenerating the person, not dressing them.
- Try a deliberately imperfect photo. Real shoppers upload bad photos. See how it degrades.
- Run the same input twice. Wildly different outputs mean high variance, and some shoppers will get the bad one.
- Read the retention policy before installing. Not after.
- Confirm there is no watermark on the plan you would actually buy, not just the top tier.
- Check where it can run. Storefront only, or API and in-store too, if that matters later.
The short version
An AI clothes changer is a simple idea with one architectural decision underneath it that determines whether the output is usable for selling. Transfer models move your actual garment onto the person and keep it recognisable. Generative models draw something similar, often more beautiful and less accurate. For social content, either works. For commerce, only one does.
Beyond that, the honest picture is that plain garments work well almost everywhere, and difficulty rises with drape, layering, transparency and fine detail. Draped clothing specifically needs a preparation step that most tools skip. Photo quality does more for your results than switching vendors. And because these tools process photographs of people, retention and moderation policies deserve a direct answer before installation rather than after.
Test with your hardest product, count something countable in the output, and you will know within minutes what any amount of marketing copy will not tell you.
Try it on your own hardest garment
Ten free try-ons, no credit card. Use them on a saree, a sheer fabric or a heavy print, and judge the output yourself.
Frequently Asked Questions
Every Try-On Is a Buying Signal Worth Capturing
A shopper who uploads their photo to see how a garment looks on them is not browsing. They are deciding. TryOnCloud captures that intent automatically: after a shopper's second try-on, an email prompt appears once the result is already on screen, so they have seen the value before being asked for anything.
Captured leads flow straight into Klaviyo through OAuth, into any CRM through a signed webhook, or out as a CSV. Full details are on your Leads dashboard with the product tried, the date, and Shopify tag status. Every try-on user is automatically tagged "tryoncloud-user" in Shopify. On install, TryOnCloud creates a dedicated "Virtual Try-On Users by TryOnCloud" segment — ready for targeted email campaigns in Shopify Marketing with zero setup.
Related reading